This post guides you through customizing two parts of your
computer: the boot screen and the Welcome/Logon screen. I show you how to
replace the boring boot screen and even how to activate a hidden boot
screen. Customizing the
Boot Screen
Every time I turn on my computer, I am forced to stare at
the boring Windows boot screen. I must admit that I found the moving bars
amusing at first, but after a few months I became bored and wanted something
different. Changing the boot screen is not something that Microsoft made easy;
however, it is still possible with a few cool hacks.
How to activating the hidden boot screen ? Over the several years that Windows Vista was in the
planning stages and in development, many promises were made about new features
and enhancements. One of those promises had to do with high-resolution boot
screens. This was going to be a great feature replacing the ancient 256-color
boot screen that has been with Windows since Windows 95. Over time, as
development of Vista was slipping behind schedule and developers were plagued
with hardware compatibility problems with the high-resolution boot screen code,
the feature was pulled from the final product. It is nothing super fancy or elegant, but it sure is better than the boring boot
screen that Vista shipped with, which looks like it is missing the Vista logo. 
Before we proceed, note that some users have problems with using
the hidden boot screen-possibly the reason why Microsoft hid it in the first
place. If you are one of those users, simply boot into Safe mode and undo the
steps for enabling the boot screen. Unfortunately, it is not currently known
exactly what hardware has problems with the hidden boot screen. When you are
ready, follow these steps to enable this boot screen on your PC:
-
Click the Start button, type msconfig in
the Search box, and then press Enter.
-
When the System Configuration Utility loads, click the Boot
tab.
-
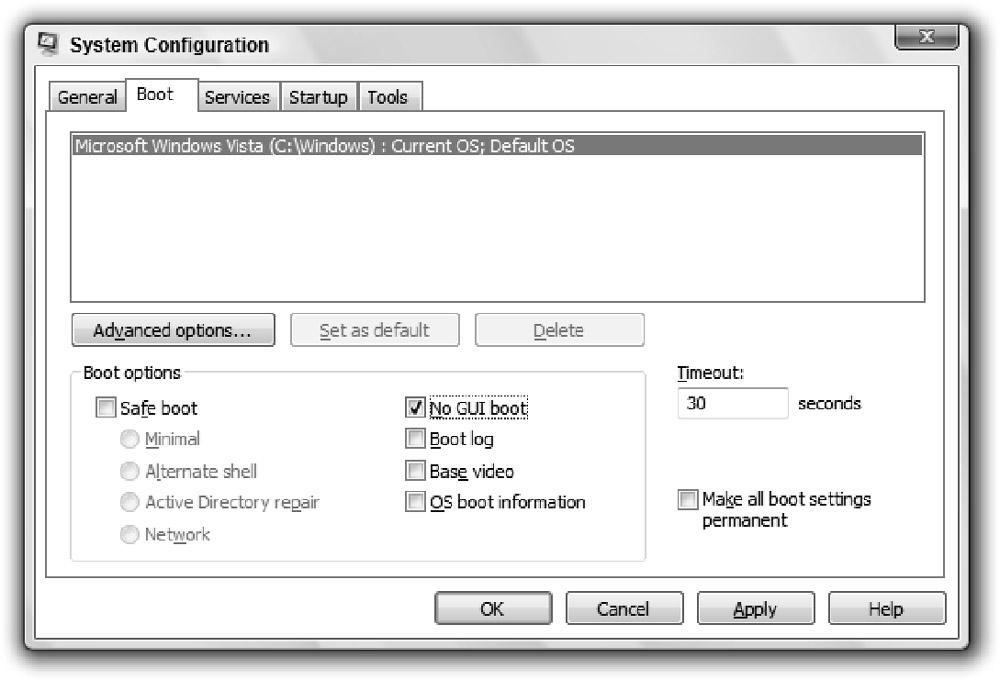
Locate the No GUI boot box and select it, as shown in Figure 1-2. Click OK and reboot your computer.
 Figure 1-2 Figure 1-2You should see the hidden
boot screen after you reboot your PC. As I mentioned earlier, if you have
problems with the hidden boot screen, just boot into Safe mode (hold down F8
when you boot up) and remove the check from the No GUI Boot box.
Customizing the boot screen image. The alternative boot screen that you just enabled in the
preceding section is a great improvement compared to the boring moving progress
bar that shows by default. However, this is still not good enough. With the help
of a few cool tricks, you can create your own high-resolution, 24-bit boot
screen without hacking any system files.
How is that possible? Thanks to the new language-independent
operating system components in Windows Vista, some resources are stored in
regional language files rather than the actual system components. This allows
Microsoft to easily create a localized version of Windows Vista in any language
by just creating new MUI (multilingual user interface) files that contain
localized versions of bitmaps and text. Because MUI files are not digitally
signed by Microsoft, you can make your own that has your own boot screen image
in it, which allows you to customize the alternative boot screen to use any
image you desire.
This new feature in Windows Vista provides a great enhancement and
alternative to the traditional method of hacking system files as you had to do
in previous versions of Windows to do things such as changing the boot screen.
In addition, there is a great tool developed by Dan Smith called the Vista Boot
Logo Generator that will automatically compile the boot images you select into
an MUI file. This makes the overall process simple compared to trying to change
boot screens, as you did in the past.
To get started, you need two
images, one 800 × 600 and one 1024 × 768 image, both saved as 24-bit bitmap
images. When you have those images picked out, resized, and saved, you are ready
to follow these steps:
-
Visit http://www.computa.co.uk/staff/dan/?p=18 and download the latest
copy of the Vista Boot Logo Generator and install it.
-
Click the Start button, type vista boot
logo, and press Enter.
-
After the boot logo is downloaded, click the Browse for
Images button in the 800 × 600 section and select your 800 × 600 24-bit bitmap
image. Do the same for the 1024 × 768 section.
-
After you have both images selected, click File and select
Save Boot Screen file as to save your MUI file. Save it to your desktop.
-
Next you need to replace the winload.exe.mui file located in
c:\windows\system32\en-us with the file you just created. However, it is not as
easy as a simple copy and paste because the Windows system files are protected.
First, I recommend making a backup of the existing winload.exe.mui file so that
you can copy it back if you have problems later. To get around the file
protections, you need to take ownership of all the files in the en-us folder.
Right-click the en-us folder and select Properties.
-
Select the Security tab and then click the Advanced button
at the bottom of the window.
-
Select the Owner tab, and then click the Edit button.
-
Select your account from the Account list and check Replace
owner on subcontainers and objects. Click OK to apply your changes.
-
Click OK to exit all the open Properties windows. You need
to go back into the folder properties to change the file permissions. This time
you will have more rights because you are now the folder owner. Right-click
en-us and select Properties again.
-
Click the Security tab, and this time click Edit.
-
Click the Add button. Type in your username and click OK.
Your account name should now appear on the Permissions list.
-
Select your account, and then select the Allow column for
Full control, - Click OK to save your changes and OK once more to close the Properties screen.
You will now be able to copy the winload.exe.mui file you made and saved to your
desktop to c:\windows\system32\en-us. After you copy the file and reboot, you
should see your new boot screen.
If you have any problems with your new boot screen MUI file, you can always boot
using your Windows Vista install CD into a command prompt and can copy back the
old winload.exe.mui file. |


